Tuesday, April 23, 2013

2 Pattern Pyramid Give Aways!

I tried this a couple of posts ago, but I'm thinking that either I put too much in one post, or no one cares about pattern pyramids anymore. I'm hoping that the first option is true because I have two pattern pyramid give aways (the first I won via Poldapop, and one from my own stash).

Here are the original rules that I've modified for these two give aways:


  • Anyone, anywhere in the world, can enter by leaving a comment on this post by midnight Central Standard Time on Saturday, May 4, 2013 but you must have an active blog for reasons that are about to become apparent.
  • I will randomly select two winners, Persons A1 and A2, and post them the collection of  9 patterns.
  • Persons A1 and A2 will then pick one pattern to keep for themselves, then host their own give-away (you know, on the active blog that they have! Oh, it all comes together beautifully). They will randomly select a winner and post the remaining patterns to Persons B1 and B2.
  • Persons B1 and B2 will pick a pattern for themselves and promptly host their own give-away and post the remaining patterns to the winner, Persons C1 and C2.
  • Persons C1 and C2 will do the same and so on until there is a last pattern winner…you get the idea.
You can enter for either pyramid, or for both, just let me know in your comment which one(s) you are in for! And to make it interesting for me, let me know which pattern in your pyramid(s) of choice you think you would keep and what you would make from it.


You can specify which pyramid (A or B) you prefer, no guarantees though. 

A: 


B: 


Sunday, April 21, 2013

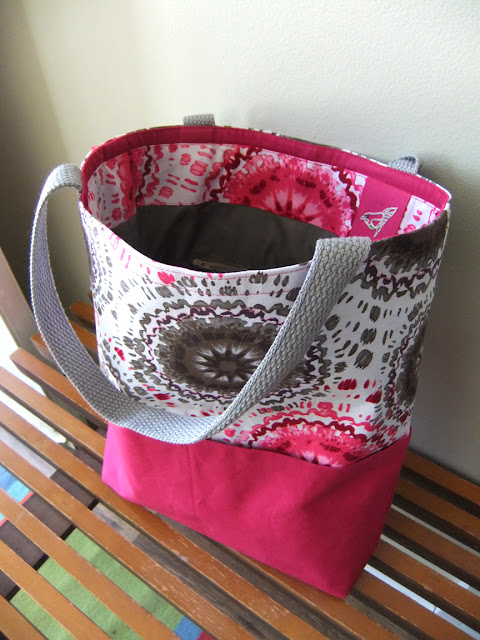
Mom's Birthday Tote


It's my Mom's birthday (two days ago), so I made her a tote.


The patterned fabric was interfaced with the stiffest fusible stuff that I could find at Fabricland (back in the days when all I wanted to make were purses).

The construction was the fly-by-the-seat-of-my-pants style where I made it up as I went along. My dad does the same thing when building decks or renovating bathrooms, so I come by it honestly.

The inside facing was an afterthought once I realized how I was going to attached the straps. I used LiEr's bag tutorial series as a reference.


I embroidered the label based on by blog banner, embellishing with a little bead. My mom is an artist who is really talented at this type of embroidery among here many other makery endeavours (I also come by this honestly). 


I only have one handed down embroidery hoop that is super large and also misplaced, so I improvised. 

It worked fine, but if I'm going to continue with this type of label, I should really find an actual loop. I'm sure the second hand store has a bin full. 


If I were to make another one of these, I would change the placement of the straps. I have them 2.5" from the outside edges, but I would move them in .5" to .75". 

Mom isn't really a "pink" person, but I couldn't find anything in turquoise that I liked. This raspberry is about the shade of lipstick she wears so I compromised.

As I was heading to the cutting table at the store, I passed by the lining section and found the most perfect match of taupe for the lining. I was informed by the woman working at the table that it even had some waterproof properties—even better for a bag lining.

I installed a zippered pocket on the inside as well with a zip I had in my stash. Installing this was definitely a sketchy moment as I didn't have any reference except a long-ago memory of sewing welt pockets on some pants a number of years ago and some tutorials I've looked at recently for bound button holes. Actually, now that I think of it, the tutorial I did a while back for an exposed zipper is similar in concept to this as well. 


Party's at 4:00!


Sunday, April 7, 2013

Twice as Nice.

I've got two pattern reviews and two pattern pyramid giveaways today.

These are a couple of pieces that I've had in my wardrobe for a while. Here are my reviews:


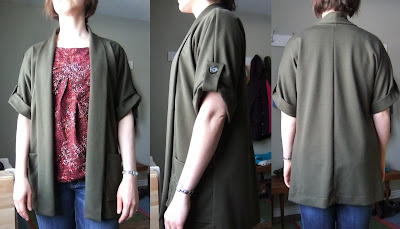
Simplicity 2262: 


Misses' pullover fress or tunic, pull on pants and knit cardigan in two lengths. I made the long cardigan.

Size AA: XXS, XS, S, M. I made the small according to my measurements. Sizing was accurate

Did it look like the photo/drawing on the pattern envelope once you were done sewing with it? Yes, exactly.

Were the instructions easy to follow? Yes.

What did you particularly like or dislike about the pattern?
SUPER easy to sew. Good addition to my wardrobe.

Fabric Used:
Olive coloured ponte knit.


Pattern alterations or any design changes you made:No alterations.

Would you sew it again? Would you recommend it to others?
I would sew it again if I needed another one in my wardrobe. I'd choose a slightly thinner knit next time though. The weight of the ponte is a bit overwhelming. A thin sweater knit would be nice.

Conclusion
I've been able to fit this into my wardrobe quite easily and I've gotten some compliments when wearing it. I find it to be an easy wardrobe staple.


Butterick 5610:


MISSES' TOP: Very loose-fitting, pullover tops A, B, C, D. A, B: yoke extends to sleeves, front pleats and topstitch trim. B: contrast yoke and elasticized lower edge. C, D: neck band, extended shoulders and partially stitched front pleats. D: elasticized lower edge.
I made view A.

Size C5: (10, 12, 14, 16, 18) I made the size 10 everywhere except the back where I graded to the size 14 at the armpit instead of doing my usual broad upper back adjustment. It was an experiment that seemed to work out.

Did it look like the photo/drawing on the pattern envelope once you were done sewing with it? Yes

Were the instructions easy to follow? Yes.

What did you particularly like or dislike about the pattern?
Sewing the inside corners where the yoke attaches to the bottom half of the front is tricky, but it was good practice. I really like the way the sleeves are constructed so they are lined and don't need to be hemmed. When I sewed this, I had recently finished my Minoru jacket and recalled Tasia's sewalong (attaching the sleeve lining to the cuff) when figuring out this bit of construction.
Other reviewers didn't like the wide neckline. I agree that it's a bit shifty when it comes to covering bra straps, but I find the wide neckline to be flattering. What I don't find particularly flattering is the side view—those pleats don't really lend themselves to a great side-silhouette, so please keep in mind that if you attempt this one, I would recommend a VERY drapy fabric.

Fabric Used:
This was a muslin that, if everything worked out, would be wearable (I wasn't sure about my "broad upper back adjustment"). So I used a super cheap poly rayon (??) that was on the $2/metre wall at Fabricland. Turns out the same fabric was used to fashion a giant wiener on the head piece of one of the girls in the production of "The Producers" I was in last summer. Now it's all I can think of when I look at this (wiener) top.


I used a scrap piece of broadcloth for the inside facing. The weights of my fabrics didn't match very well, and it affected how my sleeves hung. I'm not sure if it was a good thing to have a more stable fabric on the inside or not. It seems to be fine. 


Pattern alterations or any design changes you made: Just grading up two sizes at the underarm for increased mobility of arms. (broad upper back adjustment). It's been a while, but I think I recall that I had to even out the hem quite a bit—the fabric drooped quite a bit in the front where the pleats were. I only had room for a narrow/baby hem after I evened it out. This was to my advantage anyway because of the drape of my fabric. I will make a note to lengthen this about an inch in the future. I also bound the inside seams (another experiment) to make things neat. Serging would have accomplished the same thing and saved time.


Would you sew it again? Would you recommend it to others?
After I finished this one, I immediately went out and bought a beautiful piece of silk/cotton and then completely changed my mind when I got home. This is one of those makes where I needed to put it away for a while so I could forget about all of the little imperfections in my sewing. Now, I like it fine. It would be nice to try view C.

Conclusion
This top is as easy to wear as a t-shirt. I really should make another one in a beautiful fabric so I can wear it this summer. 


Now on to the good stuff

It was hard for me to pick what I wanted to keep from the pattern giveaway I recently won. the options were limited and picked-over, so I decided to do a little spring cleaning and shake things up a bit. I'm now offering TWO pattern pyramid give aways!! 

Pattern Pyramid A:


Pattern Pyramid B:


If you want, you can specify which pyramid (A or B) you prefer, no guarantees though. 

Here are the rules for entry in the giveaway:You must have an active blog.You must leave a comment and include your email.I will randomly select the lucky winners (2).I will then post off the patterns.
Anyone, anywhere can enter the giveaway by posting a comment below by midnight Central Standard Time on Sunday, April 14, 2013. 

Happy Sunday!


Tuesday, April 2, 2013

Um... Pardon me?

Every time we visit my mother in law, she gives me a little (or big) sewing/crafting gift that I am only too happy to take off her hands (she was a home-ec. teacher for many years). This trip, she did not disappoint!


What the hell is going on here? First off, her pants... and matching lace-up T... and does she know her pants don't actually have a pocket? She probably forgot and is now fishing out change for a Dr. Pepper at the vending machine. yikes.

And that's not the only gooder in this 49 cent wonder of 80's styling:


I actually think the purse is cute and the white hat is sort-of cool looking. Everything else is very typical crochet-ugly (in my opinion).

What else... oh yes... I WON A PATTERN PYRAMID!!!!
Thank you to Poldapop for the special addition of the fabric. It's very "me" as my sister would say, though I'm not always sure if that is a good thing or a bad thing. In this case, I'm going to say good thing. It's been slated for the Sewaholic Alma blouse, provided I can work out the fit.


I'm not sure what I'm going to keep. I have it narrowed down to these two:


The women's pattern is a size too small for me, but I'm sure I can grade it up and use the blouse/jacket adding a peplum to the bottom. The skirt may come in handy too. The men's pattern is interesting. It's one of those ones that has no markings on the tissue, just holes punched through. I may keep it just to study it a little. The shorts are neat. They include the swim-trunk man-panty lining.

There's a stack of patterns that I'd like to giveaway myself, so please stay tuned in the next week or so for a post about this pyramid as well as the start of my own pyramid giveaway.

Now on to my pattern review:

McCall's 6404


Close-fitting, casing with elastic.

XS to XL. I made the Small, view B, no contrasting fabric.

Did it look like the photo/drawing on the pattern envelope once you were done sewing with it?yes

Were the instructions easy to follow? yes

What did you particularly like or dislike about the pattern?
The style lines are nice. There are a lot of options.

Fabric Used: Denim-look cotton/lycra knit

Pattern alterations or any design changes you made:
1. First off, my measurements should have dictated that I cut a Med., but after measuring a couple of pairs of work out shorts, I decided to make the small, and I'm glad I did. They would NOT have looked like the image if I had made the larger size.

2. I lowered the front rise by about an inch to 1.5".

3. I found I needed a "muscular-bum-adjustment" and followed the "full bum adjustment in "Fit for Real People", scooping out the seat curve a little (about 3/8") and adding 1/4" to the side seam of the back pieces only.

4. I found I had a little too much fabric in the front so I decreased by about 1/4" on both sides of the front pieces at crotch level grading out to nothing at the waist.

5. The back then needed to be raised significantly (can you say plumber-butt?). I added a yoke to the back to make up the difference (about 2") to get to my waist. It ended up wrapping around the side a little.

6. I didn't think I'd need to add a waist band because I wanted them to be low-rise like my rtw work out pants, but I still needed the width of the elastic band for them to be comfortable.

The length was perfect on me and all I had to do was hem them according to the directions.

Would you sew it again? Would you recommend it to others?
Now that I have made my pattern adjustments I will most likely make these again.

Conclusion:
I know others had issues with fit for this one. I can only say that if you have a more muscular frame (ie: not skinny legs) you will probably have more luck with this one. Keep in mind that I also used a smaller size than I was supposed to.

Front:


Back: 


I'm sure there must be a way to get rid of the wrinkles under my bum. Thoughts anyone? Is there such a thing as a sway-ass?


Side: 


You can see here that the waist is now tilted down at the front a little, and where I added the yoke (and where the waist would have been if I hadn't added it).
The yoke wraps around the side seam to the front a bit. It's just how it worked out to get the waist where I wanted it.


Close up of the let inset at the corner.


The yoke at the back:


Inside seam finishing. I used navy thread in three of the spools on my serger and red in one.