We had a ridiculously horrid rehearsal last night. To be honest, I'm finding it hard to be excited about our first full dress rehearsal tonight.
I didn't have my wig on yesterday and I was already sweating buckets. One girl in the chorus was drunk and fell down the last couple of stairs in her 4" platform heels (don't worry, I think being drunk kept her relaxed so she wasn't hurt). I thought I had a quick change and raced to get into what I thought was my next costume holding up the scene by 4 minutes when really, all I had to do was put a coat on over what I was already wearing. These were the most memorable mishaps of the evening, but believe me when I say that there were many many many more. Many.
I know I'm supposed to be having fun, and I'm sure I will. I'm hoping that tonight's rehearsal will surprise me and things will start falling into place a little more.
As for sewing. I took the week of the run off work, so I will have all of my days free to finish up some UFO's, and hopefully start something new. In the past, I've made a dress for the cast party, but I think this year, I might get another wear out of the red vogue I've already worn to a couple of weddings. It's a great dress, and I won't get a lot of opportunities to wear it again this summer.
UFO's I need to get finished:
1. Navy and white 80's dress. I'm at the stage where I'm attaching the lining to the zipper and hemming it, but after a try-on, even though it's a woven, I don't need the zip, and the lining shows at the sleeves, so I'm going to cut it out, go with facings and wear a slip. I'm also going to make a little tie belt for it, and hopefully find a bright red, orange or yellow skinny belt to wear with it in the future.
2. Bikini remake: I'm copying my favourite bathing suit. I took it apart and have had it underway for a long time. I got scared I was going to fail after installing some elastic for the fourth time and was easily lured away by other projects. I'm going to adopt a new fearless attitude and try to get more of it done. There's a lot of new skills to learn on this one.
3. I started a pair of pants. After the first try-on of said pants, there were issues with fitting in the waist. I think I can make them work. We'll see if I have the patience.
New projects:
1. Vintage shirtdress. I have the pattern. I have the fabric. I'd love to have the time to do a post about them. Stay tuned.
2. Summer tops.
3. Summer shorts
Hopefully in the next week, I can report on some progress with my ufo's.

Wednesday, June 27, 2012

Tuesday, June 19, 2012
What I've been up to: (some sewing required)
I've been busy. Really busy. Like... rehearsals every day busy (thus no posts or sewing really)
My husband and I both got leads in our community musical theatre group's production of The Producers. He's Franz (the Will Farrell character in the movie), and I'm Ulla. I usually sew for the shows we are in, and because of the demands on my time, my costume mistress usually doesn't give me too much to do.
This year, I was assigned this dress:

I've made it before for another review show a couple of years ago so I'm familiar with the pattern. I wish I could tell you what it was, but I gave it back to her a while back and it's out of print anyway. I had to make no less than three muslins of the bodice (I'm wearing one of those bras that bumps you up at least two sizes) and I'm not used to sewing for that much boobage.
It's hard to see because of the patterned fabric, but this dress features a front drape that's faced and a couple of pleated scarf-like pieces that are sewn into the bodice side seams that you can wrap around yourself in a number of different ways.
Even after three muslins, I had to take it in on the bodice sides from 1/2" each side at the armpits to 1/4" at the waist and I eased the difference into the waist seam at the sides. The skirt portion is a size 10 graded to a 12 at the waist. Since the bottom half fit so well, I used this pattern to make a little skirt (without the drape) that may make an appearance in future postings.
Looking at this picture as I am writing this, I feel like something should be said about that wig: It's hot.
I have several other costumes that I will try to get pics of to show you, only because they are hilarious. If you are familiar with The Producers, you might know what I am talking about. I've got a few little fixes to do on a couple of other costumes (including some fringe on my white leotard that looks as though it was applied while thoroughly hammered).
I also got eyelash extensions yesterday. Our makeup lady is training in their application so I got a free set. They stay on for 3-4 weeks, and I suck at putting on false eyelashes so it will save me a lot of time. For those of you who are interested, application costs somewhere in the range of $120-150, and you can't get them wet for 2 days after you get them.

The show runs for 10 days, and we have just under two weeks of rehearsals left. Every day that thought becomes less terrifying as we pull it all together.
Breaking a leg!!
My husband and I both got leads in our community musical theatre group's production of The Producers. He's Franz (the Will Farrell character in the movie), and I'm Ulla. I usually sew for the shows we are in, and because of the demands on my time, my costume mistress usually doesn't give me too much to do.
This year, I was assigned this dress:

I've made it before for another review show a couple of years ago so I'm familiar with the pattern. I wish I could tell you what it was, but I gave it back to her a while back and it's out of print anyway. I had to make no less than three muslins of the bodice (I'm wearing one of those bras that bumps you up at least two sizes) and I'm not used to sewing for that much boobage.
It's hard to see because of the patterned fabric, but this dress features a front drape that's faced and a couple of pleated scarf-like pieces that are sewn into the bodice side seams that you can wrap around yourself in a number of different ways.
Even after three muslins, I had to take it in on the bodice sides from 1/2" each side at the armpits to 1/4" at the waist and I eased the difference into the waist seam at the sides. The skirt portion is a size 10 graded to a 12 at the waist. Since the bottom half fit so well, I used this pattern to make a little skirt (without the drape) that may make an appearance in future postings.
Looking at this picture as I am writing this, I feel like something should be said about that wig: It's hot.
I have several other costumes that I will try to get pics of to show you, only because they are hilarious. If you are familiar with The Producers, you might know what I am talking about. I've got a few little fixes to do on a couple of other costumes (including some fringe on my white leotard that looks as though it was applied while thoroughly hammered).
I also got eyelash extensions yesterday. Our makeup lady is training in their application so I got a free set. They stay on for 3-4 weeks, and I suck at putting on false eyelashes so it will save me a lot of time. For those of you who are interested, application costs somewhere in the range of $120-150, and you can't get them wet for 2 days after you get them.

The show runs for 10 days, and we have just under two weeks of rehearsals left. Every day that thought becomes less terrifying as we pull it all together.
Breaking a leg!!
Monday, May 21, 2012
Vogue 1209 Review...finally.

I had a chance to wear this dress again to the wedding of some great friends about a month and a half ago and took the time to get some pictures.
Here is my PR review:


Pattern Description:
MISSES' DRESS: Close-fitting, above mid-knee length, lined dress has front scoop and low back neckline, cap sleeves, front and back gathers underneath tabs, lower front detail seam, back peplum and side invisible zipper.
Pattern Sizing:
Comes in sizes 4-18. My measurements are quite a bit off from the pattern envelope, but I held my breath and cut out a 10 which is my usual size in the top and sometimes bottom. It turns out Vogue lies, or the dress is very forgiving because I only had to make a few adjustments!! I sewed a size 10 with minimal adjustments.
Did it look like the photo/drawing on the pattern envelope once you were done sewing with it?yes
Were the instructions easy to follow?
yes
What did you particularly like or dislike about the pattern?
I like everything about it.
I like everything about it.
Fabric Used:
A tomato-red poly of some kind with an interesting faint stripe in the weave and a nice drape. I tried to find something that was crepe-esque.The lining was another poly of some kind with a slightly lighter weight.
Pattern alterations or any design changes you made:
1. I took in the front 5/8" from either side which will keep it on my shoulders. I think is essentially a small bust adjustment.
2. I'm adding to the length about 2.5" plus hem allowance.
3. I added to the peplum length about 1 1/2". I was worried about the peplum not being in proportion with the added length, but it turned out great.
4. I let out the side seams about a 1/4 " on both sides at the waist tapering to nothing at the underarm and the hip. It was a tad snug, and I I wanted to be able to eat in it.
Would you sew it again?
Would you recommend it to others?
It's pretty distinct. Never say never. If I found a beautiful patterned fabric, I might make it again. Maybe convert it to a top?? Who am I kidding? I have about a 1000 other projects that are in the cue before I ever get back to this one.
Conclusion:
I LOVE this dress. I was so pleased that it came together so well. There were a couple of tricky sewing moments attaching the lining to the facing on a curve, but beyond that, it was smooth sailing. The narrow hems are a little finicky and time-consuming, but they look so nice. I screwed up one in one place where I forgot to add to the length on the side pieces and had to pice on an extension, but with all of the other seaming on this dress, it's not a noticeable mistake. Also, this was another reason to practice inserting an invisible zip.
One thing, you do have to wear bra converter straps to lower the back of your bra.
Here are more pics:
(yes, those stockings B and I made each other still haven't been taken down...

back

bra converter

Wednesday, April 11, 2012
Vintage Pattern Contest Entry: McCall's 4236

This is my very first contest entry with patternreview.com (PR). This one had my name written all over it, and the timing finally worked out. Even though I've just started rehearsals and things have picked up at work, and I'm sewing a dress for the show, I managed to fit in a little top made from one of my recent vintage pattern purchases.
McCall's 4236
Pattern Description:
From1974. Pullover dress or top has scoop neck and gathered sleeve cap. Dress B with optional belt, or top C has collar included in front neck and shoulder seams. I made the top with collar, view C.
Pattern Sizing:
My pattern came as a size 10 and I graded up to a 12 using a diagram in "Fit for Real People"
Did it look like the photo/drawing on the pattern envelope once you were done sewing with it?
yes.
Were the instructions easy to follow?
Yes. It's a basic top with a couple of order-of-assembly differences I had to pay attention to because of the drape.
What did you particularly like or dislike about the pattern?
I love how vintage patterns have the seam allowances marked. It makes it much easier to fit. I also really liked the rows of gathering stitches. They were a nice design detail. The gathered sleeve isn't something I normally go for, but they are cute and not too exaggerated for it being a 70's pattern.
Fabric Used:A teal green cotton jersey I found at the second hand store. There was so much of it, I was able to make a muslin out of it as well.
Pattern alterations or any design changes you made:
I made my usual broad upper back alteration. In my test version, I tried to use binding instead of the facing, but opted for the facing because in the end, it was going to be tacked down in 4 places so it doesn't flip around at all. Plus, my binding application skills really need some work.
Would you sew it again? Would you recommend it to others?
I don't think I'd sew this version again, but I can see using the base of this pattern to work off of. I'd like to try a peter pan collar with a cap sleeve. I'd also like to try the basic shape and work applying binding to the neck hole that doesn't look like crap. The dress version (in a shorter length) might come in handy too some day.
Conclusion:
I like this one. It is a bit cumbersome when playing with my infant nephew—the drape in the front kept swinging around and getting in the way, but it really is perfect for work—especially under a blazer. Even in a solid colour it has some interest.
On fake me:
On fake me:


On real me:


Close up of the gathering stitches:

Sunday, March 18, 2012
A Great Haul
There are 5 second hand stores I visit semi-regularly for patterns, fabric used furniture and ugly/charming vintage serving dishes. In the past, I've scored a great chair for $75 and a solid wood sideboard for $80 that is in the process of being refurbished as a vanity for our basement bathroom remodel.

They may not look like much, but I have TERRIBLE feet to fit (wide and flat with a narrow heel), and I will still need to employ some moleskin to avoid blisters, but there's enough wiggle room that I should be okay.
At store #2 (also an Army & Navy), I had no luck with shoes, but came across some excellent patterns. 6 for $1.74!! I've circled the styles I'm interested in.
I was not very sure about the striped dropped-waist (top left) but I've since had a vision I will share with you later on.
I'm very excited about the shirt-dress (top middle). I went thorough the instructions of this one, and it includes bound button holes, which I think I've done once, but don't really remember.
I really like the green knit and it's dance-leotard-like rouching at the bust.
I was thinking about using Style 1855 as the basis for my ombre hoodie idea . I like the idea of a poncho/batwing type shape, but I get lost in it and need more shaping, so this might work.
The vogue jeans are for my pattern stash. I have another Vogue jean pattern from a previous second-hand store outing that I have to try as well.
And the Butterick 6025... the pintucks. I think I'll take out the gathers on the sleeves caps though.

Next stop: Value Village. Also no luck with shoes. Again, scored patterns and also fabric, and also...

Boot shapers. Insert into boots and they stay vertical maintaining the shape. $3!
I also found some lovely patterns to add to my stash ($.99/each). I've circled the ones I'm interested in.
I'm not one to wear a cowl, but McCall's 4236 appealed to me.
McCall's 4325 is apparently a nightgown, which I only realized upon closer inspection once I got home, but to me it looks like a maxi-dress pattern. I'm not one to wear a maxi-dress either (at least not lately), but maybe I'll find some fabric that begs to be made into one.
The cap sleeve on the Style dress pattern was what attracted me to it. The zipper in the front is pretty great too. Exposed maybe?
The Simplicity shirt pattern promises a lesson in how to sew a shirt, which I'm already familiar with, but maybe I'll learn something new.
Butterick 6519 is a maternity pattern (again, something I noticed after I got home), but I still love the colour blocked version here.
The Simplicity men's shorts is a pattern that B and I looked at for him a while back.
How could I pass up an adult halloween costume pattern?
Simplicity 5918 looks like a pretty cute blazer. I have another blazer in the cue that I'm working up the nerve to tackle first, so this will have to wait.

The fabrics I found:
Dark navy dalmation-type polka dot. 3 metres for $6.


It feels like polyester, and after a burn test, I'm positive.

The drape is really lovely, and I think I'm going to pair it with this pattern. In my head, the drape lends itself to a flapper-type silhouette. I can see it with a long string of pearls. I can also see it with some shaping dart added and a little belt, fabric or otherwise.

Fabric #2 is a teal sweater knit with a nice multi-coloured heather. 2 metres for $8.

It has almost no stretch to it and it's quite thin, so I'm going to use it as a woven. I'm matching it with the cap sleeve dress with the zipper front:

I'll have to see what's available for zippers to determine if it's going to be exposed or not. Probably not. More like invisible.
I don't wear a lot of dresses, but the teal sweater knit is pretty casual and can be worn to work, and the dalmation-dot (if it works out) can be worn for my nephew's baptism.
All in all, I spent just under $40. A good day.
Monday, March 12, 2012
Simplicity 2191 done!

Style changes:
1. Shortened the sleeves 4 inches
2. Changed the shape of the neckline and sleeve facings
3. Used a 9 inch exposed zip.
4. Added piping to the neckline and sleeve hems
Fitting changes:
1. my usual 1/2" broad upper back (pivot method used here from the Slapdash Sewist)
2. grade out 1/4" at the hips
My measurements matched best with a 12 at the bust, and 14 at the waist and hip, but I cut a straight 12, A-cup.
The piping. Oh the piping. I had some faux brown leather in my stash that I thought worked really well with the feel/colour scheme of my fabric and decided to make my own piping. I bought what I thought was a light-weight cord, but because my fabric was quite light, it was like I had a wire insert in my neckline. I took out the cord which fixed the problem. On the sleeves I should have sewed my piped facings in the round, but I was being lazy and applied them to my sleeves before sewing the sleeves in flat and then sewing up the sides. This left me with a raw edge on the inside of my cuffs instead of a nicely faced hem, but I serged it and am not loosing sleep over it.
I will not be modifying the neckline again this much as doesn't always sit quite right, and the front opening "flaps" don't always lie flat. The fabric is quite light and the top is quite slouchy so it's forgivable.
The shape of the bodice is really flattering. It's roomy but NOT boxy which is something I'm always looking for. It looks good tucked in and not tucked; belted and not belted.
My fabric is a cotton voile?? It's a lightweight cotton with a loose weave and a slightly crinkly texture. I fell in love with the pattern/colour and it was on sale.
I will be sewing this again, and I recommend this to others. I'm looking forward to sewing up the short sleeve version.
It's an A++. Very rarely, if ever, have I ever wanted to sew a pattern up more than once, but I have lots of ideas for this one.
Belted (I need a new belt):


Untucked, no belt:


Sunday, March 4, 2012
Exposed Zipper Tutorial
I've started Simplicity 2191. I made my muslin and my pattern revisions (full review to come later). I wanted to change the back zipper to an exposed one (and a much shorter one at that). All of the tutorials I found on the web were for the zip to be placed on the outside of the garment, with wasn't exactly the look I was going for so I put this tutorial together of what I ended up doing. I guess you could also call it an inset zipper??
 1. Firstly, determine where the bottom of your zipper will hit on the seam (here it is marked with a green head pin). Line up the top of the zipper tape with the edge of your fabric. The extra will be included in the seam at the neckline, so the zipper pull will go all the way to the top once the facing is installed later on.
 2. Sew your seam. Here it's 5/8". I've basted the seam up to where the zip ends (green head pin) and then sewed at a standard stitch length for the rest of the seam below the zip. This is so it's easy to open those stitches later on.
 3. Press the seam open. Next, determine how much of the zipper tape you want exposed. In this instance it's just over 1/4", or to the edge of my presser foot. You will now be working from the wrong side of the fabric.
 4. Sew the distance you determined in step 3 (to the edge of my presserfoot) away from the seam through the seam allowance and the fabric.
 5. Cut down the middle through the basting threads (from step 2) stopping about 1/2" before you get to the right angle stitches and cut diagonally to the stitches in the corners.
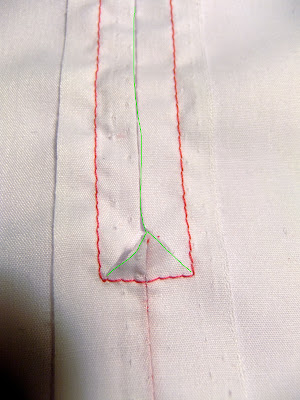 6. Here you can see these diagonal cuts into the corners. Now you have three "flaps": two long and one triangle
 7. Press the "flaps" over to the inside of the garment along the stitching (from step 4).
 8. Turn your work over to the right side over the zipper (facing up) so it shows through the opening you made in step 7. Line up the top of the zipper tape with the top of your fabric. Centre the zipper stop in the open space lining it up with the seam below.
 9. Pin and/or baste the zipper in place.
 10. Sew it in using your zipper foot.
Below is the final zipper insertion into my blouse:
 I'm pretty happy with how it turned out. I had some issues with pivoting at the bottom. My fabric doesn't have a lot of weight and I think my tension was off.
 Here you can see at the zipper stop it's a bit of a gong-show because of the problems with the corners. With how busy my fabric is, I'm not going to worry about it. It's in the back of my garment, so I'll never see it!
 Here is the reverse.
 Here you can see that the edges that extend past the zipper tape are already folded over/finished, so it's all nice and neat inside.
That's it! This is my first tutorial so let me know if you don't understand anything. I'm hoping that my pictures will pick up any of the slack from my written directions. Also, if there's a different way you know of that would work better, by all means—please let me know.
Now off to work on my shirt. I'm aiming to have it done for a friends birthday outing on Wednesday. We'll see...


Below is the final zipper insertion into my blouse:


That's it! This is my first tutorial so let me know if you don't understand anything. I'm hoping that my pictures will pick up any of the slack from my written directions. Also, if there's a different way you know of that would work better, by all means—please let me know.
Now off to work on my shirt. I'm aiming to have it done for a friends birthday outing on Wednesday. We'll see...
Subscribe to:
Posts (Atom)