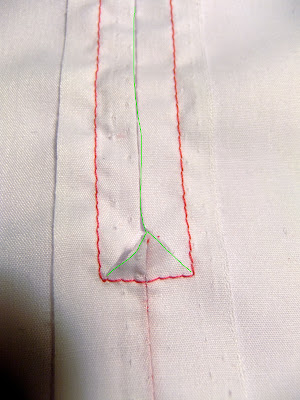
2. Sew your seam. Here it's 5/8". I've basted the seam up to where the zip ends (green head pin) and then sewed at a standard stitch length for the rest of the seam below the zip. This is so it's easy to open those stitches later on.
3. Press the seam open. Next, determine how much of the zipper tape you want exposed. In this instance it's just over 1/4", or to the edge of my presser foot. You will now be working from the wrong side of the fabric.
4. Sew the distance you determined in step 3 (to the edge of my presserfoot) away from the seam through the seam allowance and the fabric.
5. Cut down the middle through the basting threads (from step 2) stopping about 1/2" before you get to the right angle stitches and cut diagonally to the stitches in the corners.
6. Here you can see these diagonal cuts into the corners. Now you have three "flaps": two long and one triangle
7. Press the "flaps" over to the inside of the garment along the stitching (from step 4).
8. Turn your work over to the right side over the zipper (facing up) so it shows through the opening you made in step 7. Line up the top of the zipper tape with the top of your fabric. Centre the zipper stop in the open space lining it up with the seam below.
9. Pin and/or baste the zipper in place.
10. Sew it in using your zipper foot.
Below is the final zipper insertion into my blouse:
I'm pretty happy with how it turned out. I had some issues with pivoting at the bottom. My fabric doesn't have a lot of weight and I think my tension was off.
Here you can see at the zipper stop it's a bit of a gong-show because of the problems with the corners. With how busy my fabric is, I'm not going to worry about it. It's in the back of my garment, so I'll never see it!
Here is the reverse.
Here you can see that the edges that extend past the zipper tape are already folded over/finished, so it's all nice and neat inside.
That's it! This is my first tutorial so let me know if you don't understand anything. I'm hoping that my pictures will pick up any of the slack from my written directions. Also, if there's a different way you know of that would work better, by all means—please let me know.
Now off to work on my shirt. I'm aiming to have it done for a friends birthday outing on Wednesday. We'll see...


Nice tutorial! I have only done a fully exposed zipper. This is a nice idea for something less in-your-face.
ReplyDeleteJust found your tutorial on Pinterest. I've put in a LOT of zips. You can eliminate the bottom "gong show" as well as the wavy results by interfacing each side of the zipper seam before starting. Cut a one inch wide piece of interfacing about one inch longer than the length of the zipper for each side. Fuse this, lining up raw edges, to the area of the zipper seam allowance. It will make a major difference in results. Seeing I have come upon this long after the original post, you may know this by now, but this might help others who have seen this tute on Pinterest. All information offered in a caring nurturing manner. Have fun with your sewing efforts becaue that's what it is really all about!
ReplyDelete