Sunday, December 22, 2013

Baby it's Cold Outside

Seriously, so fracking cold that I walk around hunched and tense like I'm expecting to get punched in the face – which is what breathing felt like yesterday when I walked to the bus stop for the last time this year. As I sit here it's -29°C (-37°C with the wind chill) – but still we will don our touques and scarves and highly unattractive ski mitts, wearing three jackets and probably tights under my jeans (which I hate like nothing else) to get the oversized can of chick peas that I plan on giving my good friend Gavin at his birthday party tonight. We have a long standing tradition of giving each other ridiculous birthday gifts like boxes of cheerios or a regifted 3-D puzzle. Usually I grab something out of my pantry, but I spotted the giant can of hummus-makings in the window the Swadesh super market bathed in a sunbeam – like angels were guiding me to the perfect gag-gift (Gavin is famous for his hummus). He'll think it's funny.

I've been concentrating very intently on my new year's dress (post to come–here's a sneak peek).


It has been quite a journey into over-fitting, franken-patterning, and then over-fitting correction (as much as I could anyway). I'm at the hemming stage and late last night, I decided to reward myself by cutting into the thick flannel plaid I bought in SanFran this summer. That's right, folks! I'm going to attempt a Christmas miracle by trying to finish sewing an entire shirt by Monday while also fitting in Christmas shopping and cleaning the house before we head out of town on Tuesday. It's just so cold that I wanted a snuggly shirt to wear while laying around the house Christmas-style reading and knitting a new toque and scarf (post to come).

I used my tnt shirt pattern and managed to rotate out the back neck dart using this tutorial from inhousepatterns.com to move that pesky shoulder dart so I wouldn't have to deal with it in my plaid.


The button placket, pockets/flaps, back yoke, and cuffs on the bias. I was going to do the collar or collar stand too, but decided it didn't need to be for some reason. I have a little extra fabric in case I change my mind. 


-----------------------------------------------------------------------------------------------
Update: I wrote this post yesterday and then didn't finish or post it. I'm happy to say that I just may finish this thing by tomorrow. I just have the sleeves and collar (already constructed) attachment left. Merry Christmas everyone!


Sunday, November 24, 2013

I am the Queen of Productive Procrastination

Instead of getting right to my holiday dress sewing I've been procrastinating. This doesn't mean that I haven't been doing anything. On the contrary. I've made myself a busy little bee so I can avoid any fit frustrations that will inevitably come with sewing for myself.

I made another version of NL6095, originally blogged about here, but this time it was a top for myself. There were some fit issues (probably why I'm so reluctant to start the new dress), and I'll probably try it again one size larger and then blog about it.

I made myself another pair of work out shorts. I used this method to copy my all time favourite shorts from Joe Clothing using press and seal wrap. I've used this method a few times to copy clothes of B's to remake so I know they will fit him.
The originals


My new pairs(s)

The pink/grey pair is what I made most recently out of a small amount of ponte knit. The blue pair is the pair I made this past summer out of remnants from my jeggings and my mom's dress. They are the most comfortable work out shorts I own. 

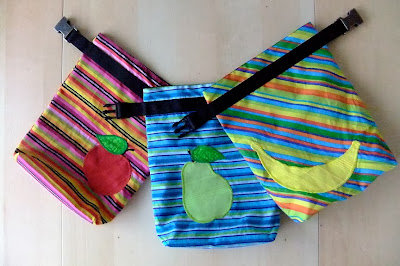
Lastly, I got ahead on my Christmas sewing by using this tutorial from Ikatbag and made three lunch bags for my two nieces and one nephew. They are all now school-aged and also pretty outdoorsy kids so  the "dry sac" idea seemed like a good match. We also won't be in the same city as the kids this year for the holidays, so their gifts needed to be easily packable in their uncle's suitcase so he can deliver them when he gets back to Calgary.


If you are attempting this project for yourself, I might suggest that you make the bag about an inch taller than you first think it should be. I'd also suggest that you use a stiff fabric. I used quilting cotton for the outside layer just because you get the best choice of prints, upholstery fabric samples for the fruit appliques, and black rip stop nylon for the inside. I wanted it to be wipeable, but it didn't need to be waterproof. All fabrics were prewashed and dried in the dryer so they can be laundered the same way. 


The only thing left to do is get to pattern tracing for my own projects. I've decided that I'm going to make both Simplicity 1654 for New Year's and the peplum top for my work Christmas party. It's liable to be a zillion degrees below zero, so I'll just stick to pants for that one. 


Saturday, November 16, 2013

The Next Dress

I don't make a lot of dresses, mostly because it's rare to have an occasion to wear them and I don't find them terribly comfortable. Give me jeans and a sweater ANY day.

It just so happens that there's a new occasion which makes for the perfect excuse to make a new dress. I could wear the last dress I made:  Vogue 12069, made a year and a half ago, but the last time I wore it (about two months ago) I realized I have been eating too many cinnamon buns so it was not as comfortable as it should have been. I've put myself on a much better eating plan, but I'm dying to try two new (to me) patterns.

The community theatre group that B and I are involved in is having their 50th Anniversary Gala this new year's eve. We've both been asked to sing as part of the entertainment, ergo, new dress. These are my two choices:


Not one person has made the Cynthia Rowley and been moved to share it on the web. I don't feel great about those odds, but I think maybe no one has attempted it because of all the seams. Looking more closely, I'm really just seeing a princess line dress with an attached skirt. It will definitely require a muslin (or three probably) and I might change the construction order so the fitting process is a little more straightforward. 

I fell in love with the blue version with the decorative top stitching, but it looks so sporty (probably why I was drawn to it) that I'm not sure it's right for a gala. What about sleeves? I like the sleeveless, but it's notoriously colder than a witch's tit here on new years and I'll take all the coverage I can get. Maybe I should just wear my cat costume... it's warm. 


Option two is this Lisette (Simplicity) 1666. I've seen this one made up a couple of times and the resulting top makes me hopeful. It has all the features I like: cut-on cap sleeve, princess seams for easier fitting (including my usual broad back adjustment), and the peplum is different too – not so sticky-outy. My friend and I were discussing peplums the other day and while we both like the shape they give, we find them uncomfortable in how they cut into your high waist and then there's a strip of skin hanging out in between that and where your pants/skirt start – especially if you like low rise bottoms.  I'm hoping by making the skirt as well–that sits on my actual waist – the issue will be resolved.

As for fabric, I have no idea. The pieces I had in mind that are in my stash seem not fancy enough once I took the whole "gala" thing into consideration. If I can get either of these to fit properly in the muslin stage, I'm not opposed to getting some really special fabric...if I can find it. Any suggestions?  

In any case, I should really get my act together because the holidays are going to come faster than I think. 


Saturday, November 9, 2013

How could I ever forget you Halloween?

We moved into our house three years ago (is that right??–maybe a little longer) and met our delightful neighbour cats Junior and Diesel. I was always a "dog person", but after meeting Junior I was a convert to the cat side. In the spring/summer/winter, they are part-time outdoor cats and never fail to visit us for some belly-rubs.


This year, the cats became our inspiration for a ridiculous couples halloween costume (we've done this before).

I thought I had an adult cat costume in my stash, but it turns out the at the sizing was not going to be big enough for B, I could have graded it, but ugh! Too much work. But, there just happened to be a pattern sale on at Fabricland so...

I used Simplicity 2853

I cut a small for me and a medium for B and added about an inch to his sleeve and leg length which was perfect. I have to say that I was pretty sick of sewing these by the end of it. Way more pieces than I usually deal with for a project. I learned this the last time I sewed a jumpsuit costume for Liam but the passage of time makes one forget. You can see my review of this pattern here.


(I'm the one on the right)

Diesel is a bit more elusive.

Didn't spot him? I'll zoom in: 

Sometimes he sits on our step.

Our inspiration:


Too much cat candy for Diesel?

I'm the only one who dresses up at work — my coworkers have come to expect it.
 How can I disappoint them?


I made both costumes out of fleece. I have never been so comfortable.

Or stylish? 

The last time I wore a cat costume was 1979. 
Halloween has always been a big deal for us.


Happy belated halloween!!


Sunday, October 27, 2013

New Look 6095

I was waiting to review this until after I had used this pattern to make myself a quick top, but we are having company next weekend, and the massive clean up of our basement/lady cave/construction site became the priority.  So no sewing until after next weekend. Instead I will placate my yearnings by taking the opportunity to finish up this project: 


This is a souvenier tote I picked up at Britex when I was in SanFran this summer. I really wanted the coloured tote but I was on a budget and had an idea for their 60th anniversary tote. There will still be some sewing to do once the embroidery is done in the form of an added lining, but that will have to wait.

Not being able to sew frees me up to put together a long overdue pattern review.


New Look 6095

My sister asked me to make this for her for a school band trip to NYC back in April. We picked a beautiful knit and I made it up without any changes except for omitting the zipper. I never got pics of it, but then my mom asked me to make the same dress for her for the summer and for their upcoming trip to Hawaii. I've only sewed for my mom once with only so-so results. My sister and husband are nearly right-out-the-envelope-people so they are easy to fit, but mom is petite and mature which equals pattern changes I've never attempted before. This pattern is so simple that I thought I'd be able to handle it. 

Using Fit for Real People, I made a petite adjustment which simply consisted of tucking up the length by about an inch and a half (if memory serves). I measured her from the shoulder to her waist and compared that measurement to the flat pattern. I made a quick muslin in some left over knit scraps of the top 3/4 of the dress to check fit which was spot on. Trust the math people. 

I was worried about the dart placement since on my sister's dress is was a little low. Not enough for her to notice, but I made a mental not to change it if I ever made it for myself. On my mom, the placement was perfect.

For both dresses I made view A (the striped version) but omitted the provided neck facing, choosing instead to do a neck band on Jana's version (like a t-shirt), and bound my mom's with some scrap white sport mesh, 


Because this pattern is drafted for a woven and I used a knit, I omitted the zipper and took in quite a bit on the side seams. The fabric we chose for Mom's was actually listed as a swim knit, but I would describe it as a thick, spongy double knit with a good amount of stretch and excellent recovery.


After sewing the seams twice using a ridiculous amount of pins, we were happy to get great matching of the stripes. 


The back view looks as though she may have needed a swayback adjustment, but it might just be the angle that she's standing at. 

I also need to add that I love love love the draft of this sleeve. The neckline is also very flattering. Since I'm basically a carbon copy of my mother, I'm assuming it will be just as flattering on myself. I'm anxious to see how it sews up in a woven, after which, I'll do a proper review on PR. 

Monday, September 30, 2013

Too Cool for School

B needed clothes to teach in, and all I needed was a kick-in-the-ass – provided by the PR mini wardrobe contest to get it together in only a month. I also stash-busted in the process.

Here are his new 4 outfits: 


After looking over my shoulder as I'm writing this post, B was heard to exclaim, "You sure know how to sew for my ass, Erin!"
-You are welcome dear. 

Pants #1: 


I've made the pants before (not blogged) many years ago, so I was at least familiar with the pattern before I started. 


He takes a 36 with no adjustment other than adding an inch to the length at the bottom.
For the first pair, I chose a slate-blue cotton twill. When I was about half way done he checked on my progress and asked, "Are those going to be clown pants?". Um... no. 
He was worried about the colour being too bright, but as you can see they read as neutral. 

I made the prescribed double welt pockets on the back but moved the button up to the tip of the dart. They were just barely long enough, meaning that I had to use seam binding to eek out all the length I could. 

I used some fabric left over from a bridesmaid dress and some quilting cotton for the pocket linings. The buttons were all that's left of some trouser jeans of mine that bit the dust a couple of years ago that had a little personality and matched perfectly. I think the overall cost of these without labour was about $6-$8. Definitely under $10.


Pants #2: 


Pair 2 is based on the same pattern but I borrowed Burda 8451 for the back pockets and the general shape of the front pockets.


Add caption

I also did fake flat felled side seams and larger/wider belt loops. The fabric (100% mixed fibres) gave an impression of dark denim thus the denim styling. I found it at Fabricland on sale for probably $6/m.

I should mention that the instructions for the zip fly on this pattern are great. I had no problems following them and I got a great result both times. There's a lot of hand basting involved, but I'll take that over tedious fitting any day. 

Shirt #1: 

A couple of years ago, I found a vintage shirt for B at the second hand store. It fit him so well that I finally got around to copying it last Christmas. He has two other shirts in his closet from that copy and his only request for changes was that the next one needed to be made out of a less wrinkle-prone fabric. 

Wish granted courtesy of a thrift store sheet. 

All seams are topstitched and I opted for a single welt pocket of my own engineering. 
You may notice that it buttons up the wrong way. I had a brain fart and even though we had just had a discussion about it, I ended up making button holes on the wrong side. "Who cares!!" I say. I added a strip of white bias binding to the inside of the front placket to distract from my not-so-perfect pattern matching which I blame on the mis-printed sheet. White cotton lines the inside collar stand under collar and pocket welt. 

Shirt #2: 


This was a new one for me and it took the most time/effort/swearing. I made a muslin and ended up adding maybe 2" to the upper back at the armpits (incidentally B and I have the same regular pattern adjustment). I also took the shoulders up about 3/8" adding that amount to the sleeve cap height. 

I had a pretty negative feeling about this shirt as I was sewing it. I chose (like an idiot) to topstitch every seam in two different colours – never do this unless you have three machines – seriously you will want to kill yourself... or someone else. When it was finished and B finally tried it on I was pleasantly surprised. Because the front of the shirt is very plain, I added two pockets with western-style flaps (that I really should have interfaced). I'm very happy with the topstitching on those though.

I really liked the construction of this shirt. Without all of the extra topstitching, this should have gone together incredibly easily. No fiddly interfacing on the front placket and the sleeves are set in the flat. I found the collar a little small for my taste (esthetically only—the pattern pieces fit together well), but it looks just fine on B so maybe I've been looking at too many vintage 70s patterns!

Again the fabric is a cotton I found at a thrift store for $6 or less, and I have some left over. Unfortunately, this will not fall into the "no-iron" category, but it fits and for me, that's what really matters. 


In the end, I think these 4 pieces probably cost around $20. Everything minus the one pant's fabric came from my stash and most was bought second-hand. B commented that with labour the cost comes in closer to $800. Yay sewing!

So folks, if you are so inclined, please head over to the Pattern Review Mini-Wardrobe Contest and vote for me and B's new teaching wardrobe. 


Thursday, August 22, 2013

I LOVE San Francisco!

If Hawaii and New York had a baby it would be San Francisco. It's metropolitan but clean, has the most friendly people I have ever encountered on a trip, and the nicest laid-back atmosphere that really appeals to my laid-backedness.


I had a great time, but before I tell you all about it, let me get this review of my blouse out of the way. 

I used Simplicity 5380 as a base. I got it second hand thinking that I would fit it to myself and then use it as a block for experimenting with details. I used the round neck version (1) for this experiment.


I added front and back vertical darts and took in the sides using my new tnt shirt pattern. In the end, I could have just used the Sewaholic Alma that I have made (and not blogged about yet). 

Then I got fancy.

Front: 
I added one larger box pleat down the centre front and three 1/4" pin-tuck pleats on either side. 

I used a piece of paper to fold up what I wanted my fabric pleats to look like, then unfolded it, measured and add that to my pattern via slashing and spreading. 

I drafted a simple collar shape and sandwiched it between the front and a facing under stitching the facing so it would not flip out. I also tacked the facing down at the shoulders and down the stitching on the box pleat down the centre front. I wasn't sure about the facing on such a sheer fabric, but you can't see it at all when it's being worn.


Back: 
I cut it across the upper back to create a yoke piece  (added seam allowance to both pieces), then added an extension to the bottom piece at centre back so I could fold it over, encasing the raw edge to make a button placket. I used some bright green buttons that were salvaged from a sewing disaster a number of years ago.


Sleeves: 
I didn't change much here. just cut a key hole shape in the centre at the sleeve hem, gathered the edge a bit and encased the raw edge in a teeny bias strip letting the ends become ties. (I bias-bound the keyhole first). Beware if you try this yourself – the sleeve edge is already coming out of the binding in one place after one washing. 


What I don't like about it: 
Once again, even though I made a muslin, the upper back is a little tight. It's mostly noticeable when driving (binds at the upper arms) – so that sucks. Also, my auto button-holler makes the holes slightly too large so sometimes, with the slight pull at the upper back, they come undone. Luckily, since I will always be wearing a tank under it, I don't care. 

I wore it to work yesterday so I could snag some pics wearing it when I got home, but my camera battery crapped out so sorry! Trust me. It's cute. 


Thursday, August 15, 2013

Britex, here I come!

I'm a dirty liar. I did finish the next shirt but have neglected to post yet.
Here is a teaser:


It's 5:30 in the morning and I'm getting myself together to catch a plane to San Francisco!!You had better believe that I'm making time to go to Britex. I am also  taking in a Turbokick live workout (no one locally teaches it so I'm pretty excited for a live class) and going to see a crazy musical review show recommended by a friend. We have tickets to  Alcatraz and are taking a morning to got to Sausalito to see the giant redwoods. My mind woke up with a start at 5:25 with anticipation. My eyes are still trying to catch up.I am the shits at taking pictures, but my travel companion is a shutterbug so I'll try to emulate as best I can so I can post about it. I promise I will post about the above blouse when I get back!Bon Voyage to me!

Saturday, August 3, 2013

TNT Birthday Shirt

Although I haven't been posting the last two months, I have been sewing.

A while back I won some fabric from Poldapop in addition to a pattern pyramid giveaway. I promised I would make something out of this great fabric and then share it on my blog. I got to the first part fairly somewhat sort-of quickly eventually and am finally getting around to the sharing. I finished this shirt on the morning of my birthday near the end of June and despite being in wardrobe rotation since, I wasn't able to take any pics until recently.

Here she is:


I made a cowboy-esque shirt. I had some moss-green velvet piping left over from a pillow project that perfectly matched the green in the fabric, and I had only in inch of waste left after I used it. My OCDness was very happy.

The pattern is a combo of the shirt in SewU (which I had tried once and found it to be unbelievably terrible), and the vintage Simplicity 7078 which was in my stash from one of my trips to the second hand store.


I've been wanting to conquer my fit challenges on the classic button-down for a long time so I decided to compare these two patterns to figure out what went so horribly wrong in the SewU pattern

When compared to the SewU pattern, there were some obvious differences:

The back: 
The Simplicity pattern back included a neck dart and extra width where I need it. Flat pattern measuring has become my best friend. After several broad back adjustments, I now just measure the width of the back to see if it will end up to be at least 19" across.
Interestingly, I'm finding that more of my vintage 70's patterns don't need an adjustment as was the case with S7078. I kept the neck darts because the back fit so well with them in my muslin that I didn't want to fiddle around with moving them and possibly wrecking what was good in the first place. I'll save that little experiment for another version.

Arm scythe: The underarm on both the front and back of SewU was much higher which I think was the major culprit for the bad fit. I used the underarm of 7078.

Neck/collar: The last 70's era shirt I made had a clownish collar that came up quite high and an incredibly large collar flaps. I lowered the 7078 neckline to match the more modern SewU pattern and drafted my own collar using this tutorial from Threads. After checking the fit with a muslin, I took about 1/4"-1/2" out of the length of the collar so I would need to ease it into the opening a little more (like other patterns I've worked with).

Sleeve: 7078 had a little extra fabric in the sleeve cap, and the SewU sleeve was so terribly ill-fitting the first time around that I didn't use either, instead opting to use the sleeve I drafted for the Sewaholic Alma a little while ago (yet to be blogged about). I can't remember which tutorial I used to draft it, but I referenced Ikat bag when drawing the shape of the sleeve head.

Torso: Since there are no waist darts on 7078, I added them in front and back using the Sew U pattern as well as referencing the Sewaholic Alma for placement and size. When taking in the side seams of most tops to give myself a little more waste definition a very pronounced curve forms – I am curvier than I thought!

The finished shirt on me (with glamorous air conditioner)


The back could still use some sort of sway-back adjustment, but I'm very pleased with the fit over all. I can reach forward without excessive strain at my upper arms which is really the main thing that bugs me when things don't fit.

A few details:
1. I used a pale yellow plaid bed sheet for my muslin and liked it so much with the flowered fabric that I used it to line the inside of my collar stand, button placket and under collar.


2. I wish that I had used snaps for closures on this, but I wasn't going to wreck it with that experiment when it was 90% done. That kind of shit takes practice.

3. I love the curved hem from 7078. I continued the hem on the inside of the side seams folding the seam allowance over twice and stitching it down for a neat finish inside. I reenforced with a bar-tacked at the bottom.


4. Button holes were forged with green thread. The buttons were also sewn on with the same contrasting thread.


5. And once again I cut my shirt when it was almost done with the serger blade *sigh*, but it gave me the opportunity to create another custom label of sorts along the bottom hem near the side seam. I love it.


6. Topstitching and velvet piping:


I regret not adding pockets. I thought it would be too much with the trim on the front, but I think it could have handled the addition.


What I'm working on now: 


A little something I envisioned via another very basic vintage top pattern that has been heavily modified. Unfortunately the second hand scarf I wanted to use as fabric (pink) is like sewing with kleenex and I abandoned it after I took these photos.


No worries. I stared a new one using a beautiful silk-cotton I picked up about a year ago at 70% off.


The idea is that I finish it before my 20 year high school reunion next Friday. It's about 75% done so it's totally doable.